BATCAM FX Overview
BATCAM FX Development Overview
1. Introduction
BATCAM FX is a real-time acoustic camera from SM Instruments. It provides 1600×1200 optical video together with a 40×30 beamforming (BF) map, so you can visualize where sound occurs on top of the video.
This document is the starting point for BATCAM FX integration development. It introduces the device’s interfaces at a glance and walks through the data flow and connection steps for the most common integration task: overlay video compositing. Detailed topics such as parameter control, ROS 2 integration, and firmware updates are covered in their own documents. For the overall developer center structure and documentation for other products (BATCAM FX2, FX Viewer), see Getting Started with the Developer Center.
2. Interfaces at a Glance
| Interface | Purpose | Related Documents |
|---|---|---|
| RTSP | Receive the raw camera video stream. On firmware 1.0.3 and later, the device can also serve a self-composited overlay video over RTSP. | Overlay Parameters |
| WebSocket + Protobuf | Real-time streaming of beamforming (BF Map), audio, and AI partial discharge (PRPD) classification results | This document, Python Protobuf Example |
| REST API | Account management, device settings (network, firmware, reboot, device info), event triggers, beamforming and overlay parameters, ROS Domain ID | BATCAM FX API Playground |
| ROS 2 | Topic/action-based data reception and configuration (supported from development firmware v1.0.3b) | ROS Integration |
| Firmware update | Install firmware via the web page or a shell (SSH) | Web Update, Shell Update |
The full REST API endpoint specification is available in the API Playground, where you can also call the endpoints directly from your browser. For the format of messages sent over WebSocket, see the fx-stream-protocol schema and the Python Protobuf Example document.
3. Overlay Video Compositing Data Flow
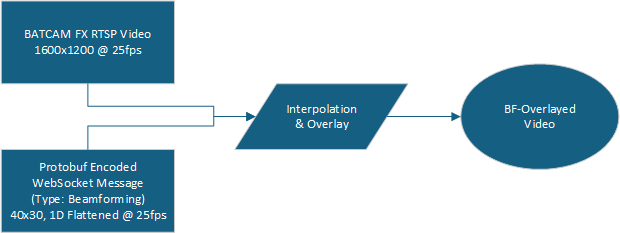
BATCAM FX transmits its data as raw camera video over RTSP and as Protobuf-encoded data over WebSocket. To obtain the overlaid video yourself, composite the video in the following order.
-
Receive the raw video from RTSP (
rtsp://{device_ip}/raw). -
Receive Beamforming messages encoded in Protobuf over WebSocket and decode them into an array of 1200 Float values (Float Array). This array is the
40x30BF Map flattened into a1x1200layout, and it is transmitted at 25Hz. -
Interpolate the Float Array to generate the image to overlay. The 40×30 BF Map is mapped onto the 1600×1200 optical video.
-
Combine the RTSP video stream with the received sound-source data to generate a real-time Beamforming overlay video.
💡 Note: On firmware 1.0.3 and later, BATCAM FX can serve an RTSP stream with the overlay image composited on the device, so a setup without client-side compositing is also possible. For configuration, see the Overlay Parameters document; for the BF Map coordinate system and Listening Point selection, see the Listening Point Coordinates document.
4. Connection Details and Authentication
In the table below, {device_ip} is the IP address of the device. Query and change the IP settings via the REST API (/setting/ip), and check the device firmware version via the device info API (/setting/status). For the full specification, see the API Playground.
| Item | Value | Notes |
|---|---|---|
| RTSP video stream | rtsp://{device_ip}/raw | User authentication required |
| WebSocket streaming | ws://{device_ip}/ws | SubProtocol must be specified |
| WebSocket SubProtocol | Subscribe | Some examples also use the lowercase subscribe form |
| REST API | http://{device_ip} | Served directly by the device |
| Firmware update page | http://{device_ip}/firmware | Web Update guide |
| Firmware update log | ws://{device_ip}/firmware/ws | Receive update progress logs |
| Authentication | HTTP Basic | Common to REST, RTSP, and WebSocket |
BATCAM FX ships with two preconfigured accounts, admin and user. Create accounts with /auth/create, list all accounts with /auth/all, and query, remove, or reset the password of an individual account with the /auth/account endpoint.
⚠️ Warning: Always change the factory default passwords before use.
Building the Authorization header — If your WebSocket library supports authentication, provide the Username and Password. If it does not, add an Authorization key to the WebSocket connection request header and include the {username}:{password} string encoded in base64.
Authorization: Basic base64({username}:{password})
# Example: username=admin, password=passwordAuthorization: Basic YWRtaW46cGFzc3dvcmQ=
Starting a subscription (Subscribe) — Messages do not start arriving as soon as the WebSocket is connected. You must send the camera a subscription for the data streams you want, using the Subscribe object provided by the pregenerated Protobuf code. The Subscribe IDs per stream are as follows.
| Subscribe ID | Message | Content | Rate |
|---|---|---|---|
| 0 | Beamforming | 40×30 BF Map (1×1200 Float array) | 25 Hz |
| 1 | WsAudio | 8000-sample Float audio (200 kHz × 40 ms) | 25 Hz |
| 2 | LPointAudio | 3-channel Listening Point beamforming audio | 25 Hz |
| 3 | Prpd | AI partial discharge classification results (firmware v1.0.3c and later; see AI PRPD Classification) | 4 Hz |
5. Example Code and Protobuf Schema
An example that exchanges data using Protobuf and WebSocket is available on our GitHub (C# example). It covers the entire overlay compositing process described above and also includes a GUI example.
The following Python example shows the flow from connecting over WebSocket and sending a subscription to decoding the first message.
import asyncioimport base64import websocketsimport fx_protocol_pb2 as pb  # pregenerated file from fx-stream-protocol
async def stream(ip: str, user: str, password: str):    cred = base64.b64encode(f"{user}:{password}".encode()).decode()    headers = {        "Authorization": f"Basic {cred}",        "Sec-WebSocket-Protocol": "subscribe",    }    uri = f"ws://{ip}/ws"
    async with websockets.connect(uri, additional_headers=headers, subprotocols=["subscribe"]) as ws:        # Start subscribing to Beamforming (ID 0)        sub = pb.Subscribe()        sub.id = 0        sub.type = pb.Subscribe.SUBSCRIBE        await ws.send(sub.SerializeToString())
        async for raw in ws:            event = pb.Event()            event.ParseFromString(raw)            if event.WhichOneof("data") == "beamforming":                bf = event.beamforming                print(f"bf count={len(bf.bf)} gain={bf.gain}")  # bf count=1200
asyncio.run(stream("192.168.0.30", "admin", "password"))
For environment setup, generating the Python bindings, and detailed examples for each message type, see the step-by-step Python Protobuf Example guide.
The schema and pregenerated files required to encode/decode Protobuf are available on our OSS GitLab (fx-stream-protocol). This document is based on the pregenerated files from the v0.0.2 tag; for other versions, check the repository’s tag list.
6. Troubleshooting
| Symptom | Cause | Resolution |
|---|---|---|
| WebSocket connection cannot be established | SubProtocol not specified | Always set the WebSocket SubProtocol to Subscribe when connecting (the subprotocols option of your library). |
| Connected but no messages are received | Subscribe message not sent | Right after connecting, send a Subscribe object (id, type) to start the subscription. (C# reference link) |
| Connection rejected with an authentication error (401) | Missing credentials or incorrect account information | Provide the Username/Password through your library’s authentication feature (C# reference link), or build the Authorization header directly in the format above. Verify that the account and password are correct. |
7. Next Steps
-
BATCAM FX API Playground — Browse the full REST API specification and call it directly
-
Beamforming Parameters — Frequency filter, gain, and LPoint settings
-
Overlay Parameters — On-device overlay compositing settings (firmware 1.0.3 and later)
-
Listening Point Coordinates — BF Map coordinate system and how to set the LPoint
-
ROS Integration — ROS 2 topics/actions and message specifications
-
ROS Domain ID — ROS_DOMAIN_ID configuration
-
AI PRPD Classification — Receive AI-based partial discharge classification results
-
Web Software Update · Shell Software Update — How to install firmware
-
Firmware Release Notes — Changes per version
-
Development Resources — Collection of example repositories and schemas